Tuesday, June 24, 2008

Strawberry Peach Stuffed French Toast

Strawberry Peach Stuffed French Toast

I have been eyeballing this recipe for a while now... It looked sooo delicious! I looooove peaches, and although strawberries are just alright on their own (in my very humble opinion), when you mix them with other flavors they can be really scrumptuous! And to top it all off, one of my favorite breakfast foods is French Toast (my Mommy used to make it for me just right). Put it all together and what do you get?? A delicious sounding concoction of delightfully sweet flavor!

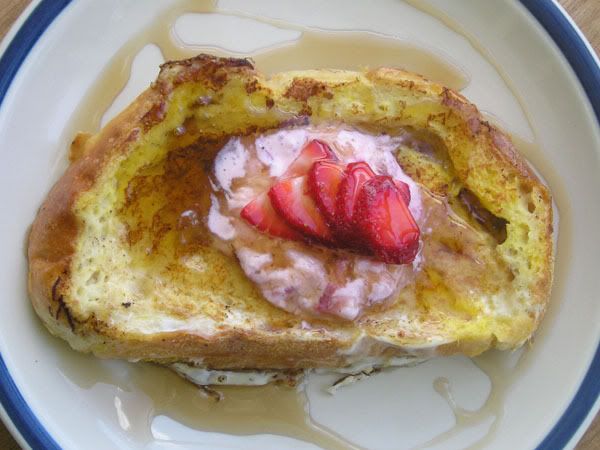
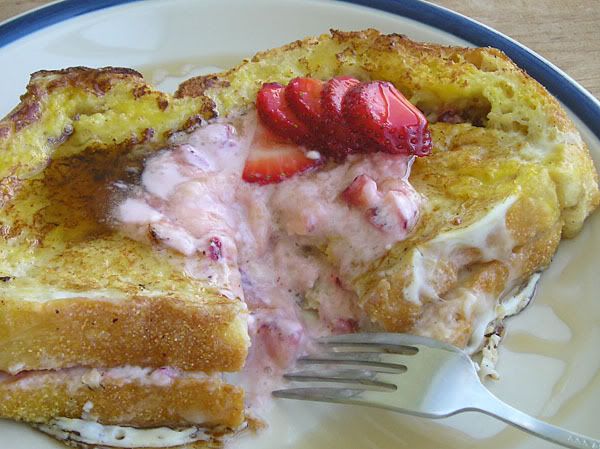
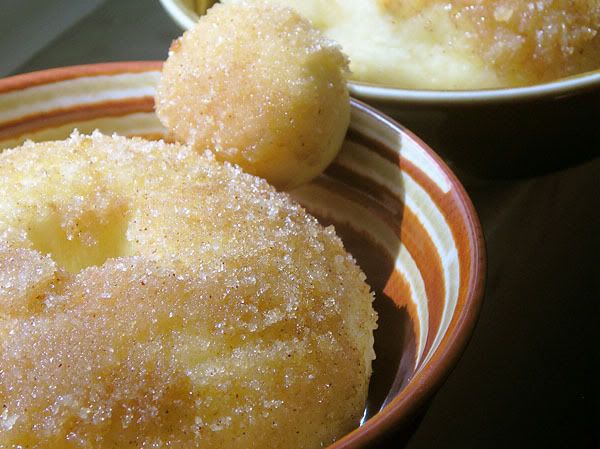
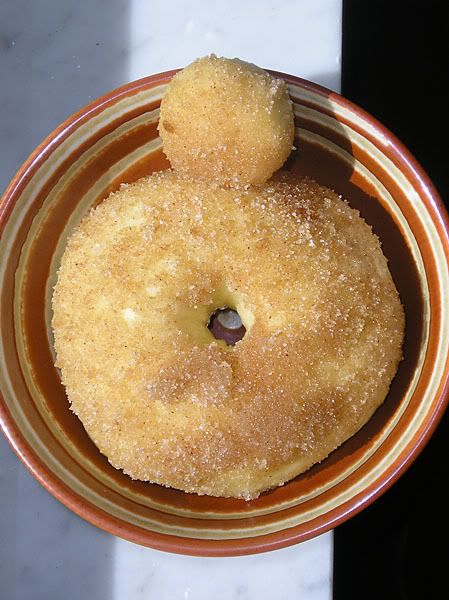
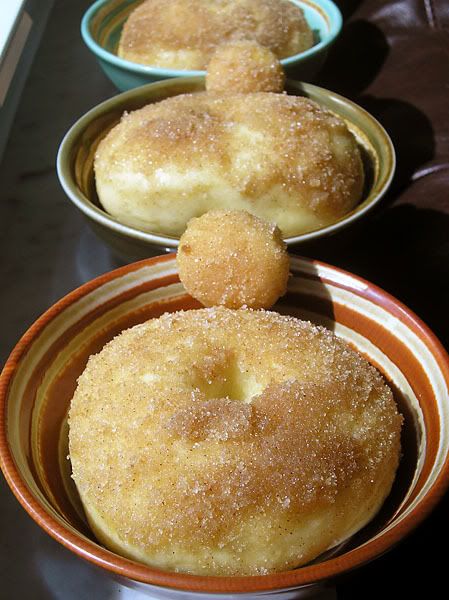
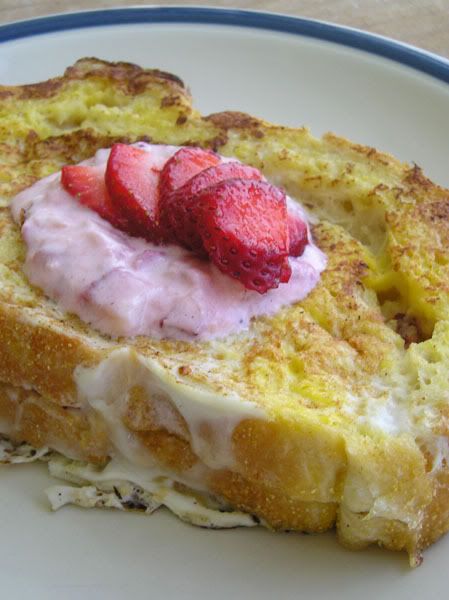
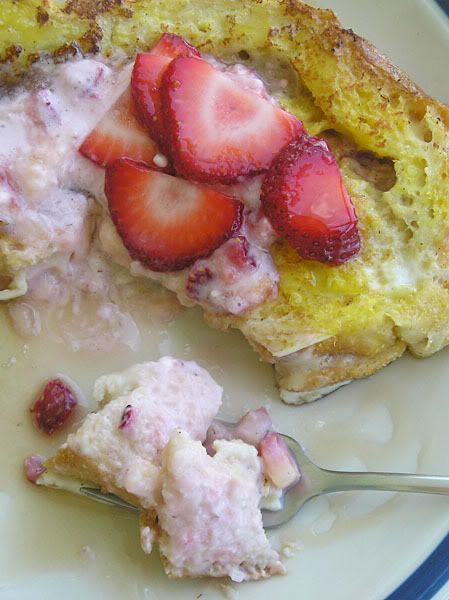
Going into this I was very nervous about the whole cutting pockets in the bread thing. I suppose I had good reasn to worry...it was kinda tricky. But! I managed to get three of my six slices pocketed just fine. And the other three were definitely still useable, just with some of the filling oozing out in places. Most importantly though, it was fun to make.

Notes
  1. Hmm, pockets. Tips on cutting pockets... Well, the recipe says to use a serrated knife but I say use what works. I ended up using a very sharp fish-cutting knife. I started by cutting a line along the bottom of the bread slice to give myself a basic guide. Then I went back and cut deeper, trying to cut to the edges but not through them. I recommend holding the bread in your hand as you work and not laying it on the table. That way you can kind of feel where the knife is so you don't cut through the "walls" of the bread. As I mentioned, it took me about three slices to finally get a feel for it.
The Verdict

I really loved this recipe - it was divine in my opinion. Mr. C found it tasty enough, although he's not a fan of fruit that has been heated up. I suppose he's a bit of a fruit-purist in that way. My sister thought it was alright but said the inner part of the bread was too soggy because of the filling. So she didn't like the sogginess. But I thought it was good - I give it two thumbs up!

And here is the recipe which I found at About.com: Gourmet Foods (they have a lot of fun recipes!):

Strawberry Peach Stuffed French Toast
Ingredients
  • 1 large ripe peach, peeled and pit removed
  • 1 pint strawberries, stem removed and diced small (I didn't use a whole pint in the filling - I saved 4 or 5 for garnish)
  • 4 oz cream cheese, soft
  • 1 Tbsp sugar
  • 1 Tbsp Grand Marnier (Optional)
  • 1 loaf of brioche, challah, or white bread, unsliced (I used a round loaf of white mountain bread from the bakery)
  • 3 large eggs
  • 1 1/4 cups milk
  • 1 Tbsp sugar
  • 1 tsp vanilla
  • 1/4 tsp cinnamon
  • butter and vegetable oil for frying
  • maple syrup
Makes 4-6 thick slices.

Directions
  1. Preheat oven to 300 degrees.
  2. For the filling: Cut one half of the peach into 1/4 inch slices and set aside for topping later. (I cut up the whole peach to use for the filling) Dice the other half of the peach into small cubes (about 1/4"). Mash together with a fork or mixer the diced peach and strawberries, 1 Tbsp sugar, cream cheese, and the Grand Marnier (if you are using it).
  3. Cut the bread into 1 inch slices.
  4. Using a serrated knife, cut a pocket in the side of each slice of bread. Try to make the pocket as deep as possible without cutting through the other side. (See notes above for tips) Place 2 tablespoons of the cream cheese mixture into each pocket.
  5. For the batter: In a large bowl, whisk together the eggs, milk, vanilla, cinnamon and 1 Tbsp sugar.
  6. Heat up a large skillet over medium-high heat.
  7. Place two or three slices of bread in the batter and let soak for 5 seconds. Flip over and soak again for 5 seconds. Remove the bread from the batter and place on a plate. Let the bread stand for 1 minute so the batter can soak in. Add a tablespoon of butter and a tablespoon of vegetable oil to the pan.
  8. Place the soaked bread into the hot pan. When you have all the slices in the pan, start soaking the next three pieces as described before.
  9. Cook each side until a light golden brown. Place on a cookie sheet or wire rack. When all the pieces have been fried, place the cookie sheet in the oven and bake for 10 minutes.
  10. Remove from oven and top each serving with sliced peaches (or sliced strawberries). Serve with maple syrup.

Strawberry Peach Stuffed French Toast


Wednesday, June 18, 2008

Chicken Curry with Coconut Rice

Chicken Curry

I've made this dish once before and really enjoyed it. The first time I made it I had all the correct ingredients (like a chunk of ginger, shredded coconut, and green thai curry paste). This last time I made it I skimped on ingredients and was surprised that it still turned out pretty darn good! I really like the nice creamy coconut flavor. It is definitely better with all the correct ingredients, but in a pinch my ghetto version worked well enough for me. Now I just need to get that great curry recipe from my friend's Mom...she makes a killer chicken curry (it's soooo spicy!).

Notes
  1. Like I mentioned, I didn't have real ginger so I used powdered ginger instead. Just add it in whenever (probably wanna add it after all the sauteing parts are done...).
  2. I didn't have Thai Green Curry paste, but I did have some of the ingredients that are used to make it. So I added a few ground coriander seeds, a dash of Fish Sauce (this one is my favorite brand), a dash of soy sauce, 1 tsp sugar, and 2 cloves of garlic.
  3. I didn't have coconut either so I just used regular old rice-cooker cooked rice. I do like the coconut version though.
  4. No peanuts! Yeah, I really murdered this recipe this time around, I know. It was still good though!
The Verdict

I like it - it's not a blow-you-away-it's-so-delicious recipe, but it's a good, pretty simple meal. Mr. C likes it well enough - he had seconds. Obviously I would make it again as this was my second time making it. Try to go for all the right ingredients if you can because it makes it that much tastier.

Here is the recipe which I found on Yumsugar:

Chicken Curry
Ingredients
  • 1 1/2 cups basmati rice
  • 2 1/4 cups water
  • 1 tsp canola oil
  • salt
  • 1/2 cup shredded unsweetened coconut
  • 2 Tbsp extra-virgin olive oil
  • 2 Tbsp minced fresh ginger
  • 1 1/2 lbs skinless, boneless chicken breasts, cut into 3-by-1/2-inch strips (I precooked boned chicken thighs and pulled the meat off the bone for texture and variety)
  • freshly ground pepper
  • 1 medium onion, chopped
  • 14 oz can unsweetened coconut milk
  • 1 cup chicken stock or canned low-sodium broth
  • 1 1/2 tablespoons Thai green curry paste (see my notes if you don't have this ingredient)
  • 1/3 cup plus 2 tablespoons coarsely chopped basil leaves
  • 3 tablespoons minced cilantro
  • 3 scallions, white and light green parts only, cut into 2-inch lengths
  • freshly ground pepper
  • 1/2 cup chopped dry-roasted peanuts
  • avocado and mango, sliced for serving
Makes about 4-6 servings.

Directions
  1. In a saucepan, bring the rice, water, canola oil and a pinch of salt to a boil; cover. Simmer over low heat for 15 minutes.
  2. Meanwhile, in a medium skillet, toast the coconut over moderately low heat, stirring, until golden, about 5 minutes. Transfer to a plate and let cool.
  3. In a large skillet, heat 1 tablespoon of the olive oil. Add 1 tablespoon of the ginger and cook over moderately high heat until fragrant, about 30 seconds. Add the chicken, season with salt and pepper and cook until lightly browned, about 5 minutes. Transfer to a bowl.
  4. Add the remaining 1 tablespoon of olive oil to the skillet. Add the onion and the remaining 1 tablespoon of ginger; cook over moderate heat for 5 minutes, stirring frequently. Add the coconut milk, stock and curry paste and bring to a boil, stirring. Simmer the sauce for 5 minutes, until thickened.
  5. Add the chicken, 1/3 cup of the basil, 2 tablespoons of the cilantro and the scallions; simmer until the chicken is cooked through, 5 minutes. Season with salt and pepper.
  6. Transfer the rice to a bowl; sprinkle with the coconut. Transfer the chicken to another bowl. Garnish with the remaining 2 tablespoons of basil, 1 tablespoon of cilantro and the peanuts. Serve the avocado and mango on the side.

Cottage Pie


Wednesday, June 11, 2008

Lychees and Longons

So today I headed uptown to hang out with my Mom for the day. Along with planting my Sunflower seeds for The Great Sunflower Project and borrowing my Mom's bike to try and cut back on gas consumption, we went to a couple Asian Food Markets in the area.

I was happy to find some good Nori, sushi rice, and most importantly a specific brand of vermicelli instant noodle that I haven't been able to find for years! I hope it's just how I remember it! They also had Longans so we decided to get a pound.

However, that particular store didn't have the brand of Fish Sauce that I like so we stopped off at one more place. They had my Fish Sauce (thank goodness) and also had Lychees! So we decided to get some Lychees as well!

Once we got home and popped out the Lychees and Longons they just looked so nice still attached to their branches that I had to take pictures. They both tasted fantastic! The Longons had an earthy almost nutty flavor and weren't as sweet as the Lychees. The Lychees were very sweet and juicy with a more fruity flavor. They both have such wonderful overtones to their flavor. And they're fun to peel! So it was a nice afternoon treat. Just thought I'd share the pictures!

Lychees & Longons


Lychees & Longons


Lychees & Longons


Lychees & Longons


Lychees & Longons


Tuesday, June 10, 2008

Cottage Pie

Cottage Pie

I have a soft spot for Shepherd's Pie because I seem to remember eating it back in my childhood. I have a feeling it may have been a very creative rendition of Shepherd's Pie, but that's beside the point! So when I found the beef version on Coconut & Lime (I love her recipes) I had to make it. Seasoned ground beef slathered in mashed potatoes.... How can you go wrong?? So right on to the notes!

Notes
  1. I don't have Smoked Paprika so I just used extra of the regular Paprika.
The Verdict

Mr. C really liked it - he even had leftovers the next day! My wonderful sister said it was really good, and I couldn't stop eating it the night I made it. Every time I wandered into the kitchen I had to have a fork-ful... I was so stuffed by the end of the night. So the opinion seems to be a unanimous "delicious"!

And finally, here's the recipe from Coconut & Lime (don't be scared off by the somewhat long ingredient list! It's mostly stuff you probably already have and they're simple, hearty ingredients):

Cottage Pie
Ingredients

Filling:
  • 1 1/2 lbs lean ground beef
  • 1 1/2 cup chicken or beef broth
  • 1 cup frozen peas
  • 1 onion minced
  • 8 oz mushrooms, roughly chopped
  • 4 cloves garlic, minced
  • 2 stalks of celery, diced
  • 2 carrots, peelied and diced
  • 1/4 cup green onions, minced
  • 1 tablespoon of Worcestershire sauce
  • 1 tablespoon Paprika (we use Hot Hungarian Paprika)
  • 1 tablespoon of corn starch
  • 2 teaspoons thyme
  • 1 teaspoon smoked paprika
  • salt and pepper to taste

Topping:
  • 2 lbs potatoes, quartered, boiled, and skinned
  • 1/2 cup sour cream
  • 1/4 cup broth (or more if necessary)
  • 1 Tablespoon Butter
  • 1/4 cup green onions, minced
  • 1 egg, beaten
  • salt and pepper to taste
Makes about 6-8 servings.

Directions
  1. Preheat oven to 450.

  2. For the filling: Brown beef in a large saute pan. When beef is browned, drain off the fat and liquid. Add the onion, mushrooms, garlic, celery, carrot, and green onion. Saute for 15 minutes until the vegetables are soft. Whisk the broth, corn starch, and Worcestershire sauce. Add broth mixture to the meat mixture along with the paprika, smoke paprika, thyme, salt and pepper and cook 20-30 minutes until the mixture is very thick and most of the liquid has evaporated

  3. For the potatoes: Mash potatoes with sour cream, broth, and butter. Add more broth if the mixture is too stiff or dry to spread. Add salt and pepper. Taste for seasoning and then mix in the egg.

  4. Assembly: Grease a wide baking dish (we used a 10" oval dish), pour in the meat mixture and spread the potato mixture on top. Sprinkle some paprika on top and bake for 20 minutes or until the potatoes start to brown and the meat mixture boils.

Cottage Pie


Sunday, June 8, 2008

Baked Doughnuts

Baked Doughnuts

I often find myself being bitten by the sweet-bug and wanting to make yummy, delicious, satisfying desserts. This dessert (can a breakfast food be considered a dessert?) didn't require that I go to the store so it was the winner! Besides, I haven't made anything that needed to "rise for one hour" in a while. I always liked coming back and seeing that my dough had grown.

My yeast was...well, it said "best if used by Oct 2007," but I figured it would probably still be fine. I think it was. I do think I added too much flour though. I'm really not sure though - although I have worked with dough like this before, I still don't really know what I'm doing! I don't know if I over-flour my dough or if it's supposed to be sticky and tacky. I think it would be helpful to have one of those mixers with a dough hook, but I don't have that kind of money. I just use my elbow grease!

Either way, they came out tasty. Fresh out of the oven and freshly buttered and sugared they're really good! After a day they're a little bit tough, but still good. And if you pop it in the microwave for 10-15 seconds it's even better.

As for how they compare to a "real" doughnut, they are quite different. These basically taste like a pretzel with cinnamon and sugar on top. At least I don't feel quite as guilty eating the baked doughnuts because they're not deep fried... They're still sinful though!

Notes
  1. I added probably 1 cup of extra flour to get a dough that didn't stick to everything... I don't know if that was right or not though. So maybe they would be a little lighter without the extra flour.
  2. I used a plastic cream cheese container as the doughnut-cutter. I cut the top inch of the container off with a knife to get a nice sharp edge. Then I used the cap of a soda bottle to cut out the doughnut hole. Worked pretty well!
  3. I only buttered and sugared one side of the doughnuts and they're almost too sweet, so I don't recommend sugaring both sides.
The Verdict

These are pretty good. They really reminded me of cinnamon buns to be honest. I think they would probably be better if I was better at working with dough too. But they are very tasty! And Mr. C liked them fresh out of the oven, but hasn't been as in love with them since then.

And here is the recipe from 101 Cookbooks:

Baked Doughnuts
Don't over bake these, if anything, under bake them a bit - they will continue baking outside the oven for a few minutes. You want an interior that is moist and tender - not dry. Also, be sure to cut big enough holes in the center of your doughnuts - too small and they will bake entirely shut. Remember they rise, and they rise even more when they are baking. These really need to be made-to-order, but you can make and shape the dough the night before if you want to serve them for brunch. Instructions: after shaping, place doughnuts on baking sheet, cover and place in the refrigerator overnight. Pull them out an hour before baking, and let rise in a warm place before baking.

Ingredients
  • 1 1/3 cups warm milk, 95 to 105 degrees (divided)
  • 1 packet active dry yeast (2 1/4 teaspoons)
  • 2 tablespoons butter
  • 2/3 cup sugar
  • 2 eggs
  • 5 cups all-purpose flour (alternately, white whole wheat might work - haven't tried it yet)
  • A pinch or two of nutmeg, freshly grated
  • 1 teaspoon fine grain sea salt

  • 1/2 cup unsalted butter, melted
  • 1 1/2 cups sugar (I used half white and half brown sugar)
  • 1 tablespoon cinnamon
Makes about 36 doughnuts.

Directions
  1. Place 1/3 cup of the warm milk in the bowl of an electric mixer. Stir in the yeast and set aside for five minutes or so. Be sure your milk isn't too hot or it will kill the yeast. Stir the butter and sugar into the remaining cup of warm milk and add it to the yeast mixture. With a fork, stir in the eggs, flour, nutmeg, and salt - just until the flour is incorporated. With the dough hook attachment of your mixer beat the dough for a few minutes at medium speed. This is where you are going to need to make adjustments - if your dough is overly sticky, add flour a few tablespoons at a time. Too dry? Add more milk a bit at a time. You want the dough to pull away from the sides of the mixing bowl and eventually become supple and smooth. Turn it out onto a floured counter-top, knead a few times (the dough should be barely sticky), and shape into a ball. (Since I don't have a large mixer with a dough hook I used my hands to knead the dough right in the bowl, then kneaded some more on my floured surface)

  2. Transfer the dough to a buttered (or oiled) bowl, cover, put in a warm place (I turn on the oven at this point and set the bowl on top), and let rise for an hour or until the dough has roughly doubled in size.

  3. Punch down the dough and roll it out 1/2-inch thick on your floured countertop. Most people (like myself) don't have a doughnut cutter, instead I use a 2-3 inch cookie cutter to stamp out circles. (Like I mentioned, I used a plastic cream cheese container as my doughnut cutter - you could also maybe use a small bowl). Transfer the circles to a parchment-lined baking sheet and stamp out the smaller inner circles using a smaller cutter. (I used a plastic soda bottle cap). If you cut the inner holes out any earlier, they become distorted when you attempt to move them. Cover with a clean cloth and let rise for another 45 minutes.

  4. Bake in a 375 degree oven until the bottoms are just golden, 8 to 10 minutes - start checking around 8. While the doughnuts are baking, place the butter in a medium bowl. Place the sugar and cinnamon in a separate bowl.

  5. Remove the doughnuts from the oven and let cool for just a minute or two. Dip each one in the melted butter and a quick toss in the sugar bowl. Eat immediately if not sooner.

Baked Doughnuts Baked Doughnuts


Thursday, June 5, 2008

Vegetable Bean Soup

Vegetable Bean Soup

After being inspired by this post on Craftster.org about cheap meal ideas, I decided to make a bean soup. I've made a bean soup once before and it turned out really good, so it's high time I make another one. The fun part about bean soups (and many other soups I guess?) is that you can just throw whatever sounds good in there. So while at the grocery store I just looked for some inexpensive veggies.

The butternut squash turned out to be delicious with its subtle burst of sweetness! And the spinach adds a lot of body. I think the spinach (and the beans) help to soak up some of the liquid so it turns out to be a thick soup. But I like thick soups. Yum.

Oh, I would like to mention that I added up the cost of all the ingredients and it cost about $13.50 to make this gigantic pot of soup. I'd say at least 15 servings, if not more. I think that's a good deal for the budget!

Notes
  1. I used chorizzo because I had some left over from a recent weekend BBQ, but any sausage/meat/whatever would obviously work. You don't even need any meat!
  2. There's not much to note because this "recipe" is more like an outline. Like taking notes in school.
The Verdict

I think this turned out to be delicious! I love all the different veggies, especially the butternut squash. And it made so much soup that I won't soon go hungry...

Here's the recipe for this particular soup:

Vegetable Bean Soup
Ingredients
  • Lots of Water
  • 1 lb bag dry 15-Bean Mix (or whatever beans you choose to use)
  • 1 Tbsp Olive Oil
  • 1/2 lb Chorizzo (or other sausage), pinched into little balls
  • 1 Onion, diced
  • 4 cloves Garlic, minced
  • 1.25 lb Butternut Squash, peeled and diced
  • 3 White Potatoes, diced
  • 1 Zuccini, diced
  • 3 stalks Celery, diced
  • 3 Carrots, peeled and diced
  • 10 oz Frozen Snap Peas
  • 10 oz Frozen Spinach
  • 15 oz can Mexican Style Sliced Stewed Tomatoes
  • 4 oz Baby Bella Mushrooms, sliced
  • 1 tsp Chicken Broth powder
  • White Pepper (Black is fine too), to taste
  • Salt, to taste
Makes a lot of servings!

Directions
  1. Place beans in a large pot, fill with water and leave to soak over night (or at least 8 hours). Make sure to fill water a couple inches over the beans because they will soak up a lot of water and expand over night.

  2. Once soaked, drain beans and rinse them. Place them in a very large pot (like a large pasta pot) and fill with water. Don't fill too much right now, you can always add more as the pot fills up with all the other veggies. Put the pot on high heat, bring to a boil then simmer.

  3. While it's coming to a boil heat the olive oil in a saute pan and add the garlic, onion, and chorizzo. Once the chorizzo is nearly cooked drain off the extra oil and add to the bean pot.

  4. Chop all your veggies and just drop them in as you go along. I didn't defrost or drain the frozen spinach and Snap Peas and I only drained a little liquid off the tomatoes before adding them.

  5. Add the chicken broth, salt, and pepper as you go along and feel free to add any other herbs or spices you like. Let all the flavors simmer together for a while until your veggies are as soft as you like them.

Vegetable Bean Soup


Wednesday, June 4, 2008

Chicken n' Biscuits

Chicken n' Biscuits

Last night I made some yummy Chicken n' Biscuits using a recipe I found on the wonderful Coconut & Lime blog. I've never had Chicken n' Biscuits before, but it always sounded like yummy, down-home, southern comfort food. I actually have 3 different recipes for this meal - I'm wondering if I should make them all and see which I like best... That sounds like an awful lot of work, but it could be fun! I'll wait on that idea though.

The cooking process went just fine with no surprises. The recipe is quite straight forward and simple. I only made one addition, which I noted in my Notes.

Notes
  1. The dough wasn't as thick as I was expecting. I used my little blender's food processor add-on thing to mix all the ingredients exactly as the recipe says, but the dough was too sticky and thin to be able to roll out and use cookie cutters on (and I was so looking forward to pumpkin and angel shaped biscuits!!). The biscuit topping was delicious just the way it was though. I used my fingers to spread gobs of the dough across the chicken mixture and it turned out fine.
  2. I added about 1 teaspoon of powdered chicken broth to the chicken mixture along with the milk. It just gave it a little extra flavor.
  3. Because I don't like boneless skinless chicken due to a bad experience once, I used boneful skinful chicken thighs, boiled them, then stripped them into chunks of chicken. So feel free to do the same if you too prefer a variety of meat texture!
The Verdict

I liked this meal a lot! I had 3 servings actually...! And Mr. C thought it was really good too (although he only had 2 servings). I would definitely make this again. Very very good comfort food.

And without further ado, here's the recipe, from Coconut & Lime!

Chicken n' Biscuits
Ingredients

Biscuit Topping
  • 1 1/2 cups Flour
  • 2 1/2 teaspoons Baking Powder
  • 1 teaspoon Sugar
  • 1/2 teaspoon Salt
  • 6 tablespoons Butter, cold
  • 1/2 cup Milk
  • 1 Egg, at room temperature
Chicken Mixture
  • 1 lb boneless skinless Chicken Thighs, cut into 1 inch cubes
  • 2 1/2 tablespoons Butter
  • 1 medium Onion, finely diced
  • 4 cloves Garlic, minced
  • 3 Carrots, finely diced
  • 3 stalks Celery, finely diced
  • 1 teaspoon Mustard Powder
  • 1/4 teaspoon Thyme
  • 1 teaspoon Hot Paprika
  • 1 tablespoons Fresh Parsley
  • 1/4 teaspoon Sage
  • 1 teaspoon Salt
  • 1/4 teaspoon Pepper
  • 1/4 cup Flour
  • 2 cups Milk
  • 1 cup Frozen Peas
Makes 6-8 servings.

Directions
  1. Preheat oven to 425 F.

  2. For Biscuits: In a food processor, pulse dry ingredients. Add butter and pulse until barely mixed. In a small bowl or cup, mix egg and milk. Pour into food processor, pulse until a dough forms. Remove to a flour dusted surface, knead 5 times then roll out. Using a biscuit cutter or glass cut out circles. Set aside.

  3. For Chicken Mixture: In a large pan saute the onions in butter until just beginning to brown. Add garlic, celery, carrots, mustard powder, thyme, paprika, parsley, sage, salt and pepper. Cook 4-5 minutes or until they begin to soften. Add chicken and saute until thighs are browned, 5-10 minutes. Add the flour and cook 1-2 minutes and add half of the milk. Cook over medium heat, stirring until thickened. Add the remaining milk and cook over medium low heat, 10 minutes, stirring occasionally. Remove from heat and add frozen peas.

  4. Pour into a medium sized casserole dish. Top with biscuits. Bake 20-25 minutes or until the crust is golden brown.


Floured and flattenedFloured and flattenedFloured and flattenedFloured and flattened


Tuesday, June 3, 2008

Hard Candy

I whipped out the beads yesterday after being inspired by some fantastic artists I found on Etsy:

tigerburningbright


emilygrayjewels


SkyDreams


They all have absolutely amazing and beautiful pieces! And I noticed that they all used a technique/style that I haven't really seen much of before. It appears to be a form of wire wrapping or wire sculpture where you take a thin wire, coil it all the way around a thicker wire and then shape it into any shape that pleases you. It's like making your own earring components in any shape you'd like. I personally think the style is gorgeous! Couple it with the sparkly stones they can afford to use in their designs and you have jewelry fit for royalty.

So! As you've probably figured out, I wanted to have a go at this. I was sure I had some left over 18 or 20 gauge wire somewhere. But being sure doesn't always equal reality! So unfortunately I didn't get to go crazy with wire wrapping. I decided I would at least try to make something without using headpins though. I would just use wrapped wire to hold my beads in place. I think it came out pretty nicely in the end!

I used gold-colored wire and findings (I can't afford the good stuff), some purple-y Czech beads as accent beads, and I'm not sure what the main rectangle-shaped beads are. I think they're probably rhodochrosite or rhodonite or something, but I honestly can't remember. They're about 5.5 cm long, not including the ear hook. I had fun (and frustration) playing with the wire and figuring out exactly what I wanted them to look like and I'm pleased with the results!

Hard CandyHard Candy


Sunday, June 1, 2008

Chicken Nuggets

Fresh Chicken Nuggets

Tonight I decided to try a chicken nugget recipe I found on For the Love of Food for McDonald's style chicken nuggets. I was really just intrigued by the idea of throwing my chicken into a blender! That sounded kinda fun. Apparently it's the secret to many fast food chicken nuggets. You learn something new everyday...

It was a bit of an adventure actually. Not the chicken-blending, but the oil-heating. I filled a pan with about 3/4" of Canola oil and set the stove to medium so it could heat up while I prepared the chicken. I've only ever deep fried something once before, so I really don't know how best to handle hot oil. When it started smoking a lot, I wasn't exactly sure what to do! I didn't know if that meant it was too hot, or if Canola is not good for frying, or what it was. Common sense told me to turn down the stove a bit though. I also flipped on the stove fan, opened the window, locked myself in the kitchen (so the smoke didn't set off the fire-alarm in the main part of the apartment), and worked as fast as I could to get all my little chicken balls flour-coated and ready for frying. My eyes were watering and I was inhaling smoke with each breath! But I pushed through, like a true warrior, and managed to get my first batch into the pan. Ok, so it wasn't that bad. But I was relieved to finally be cooking!

Everything went smoothly from there. No problems with the oil. It cooked the little nuggets (or patties in my case) to crispy, golden goodness. After about 4 minutes I would lift one with my fork to check that it was golden enough before I flipped them all.

Notes
  1. I made them too thin! They ended up 1/4-1/2" thick. I would make them thicker next time.
  2. After reading in the original recipe that some people thought they weren't flavorful enough I was sure to add a bit more onion powder to the chicken mixture and added salt and garlic salt to the flour mixture. However, I think for my nuggets (because I made them too thin) it made them too salty. I wouldn't change the recipe if I made them again.
The Verdict

Overall I thought they turned out pretty good! My boyfriend, Mr. C, really liked them too. That means they must be good! Although I thought they were a bit too salty, Mr.C thought they were just right. It all depends on how much you like salt. I would make these again I think - if only to plump them and reduce the salt. Then I could give a final verdict.

And without further ado, here's the recipe, from For the Love of Food!

Fresh Chicken Nuggets
Ingredients
  • 2 boneless skinless Chicken Breasts (that’s 4 breast fillets)
  • 1 teaspoon of Salt
  • 1/2 teaspoon of Parsley flakes
  • 1/2 teaspoon of Oregano
  • 1/4 teaspoon of Onion powder
  • 1/4 teaspoon of Pepper
  • 2 Eggs, beaten
  • 1 Cup of Flour
  • about 1.5 Cups of Oil for frying (I used Canola oil)
Makes about 34 nuggets

Directions
  1. Heat oil in a heavy-duty skillet (like a cast iron skillet) on medium-high heat while preparing the chicken nuggets - it should be ready to work with once half of your nuggets are ready to go in.

  2. Cube chicken and place in a food processor. Blend chicken until it has all been taken apart and is a fine paste. Remove to a bowl and add salt, parsley, oregano, onion powder, and pepper, and combine well.

  3. Pour out flour on a plate and have your beaten eggs in a small bowl ready to work with.

  4. Roll the chicken paste mixture into 34 ping-pong ball-sized balls (smaller than a golf ball).

  5. Roll a “chicken ball” in flour, then in egg, and then in flour again. Then, press the ball down to make a nugget. Watch this video to see how to do it. Set nuggets aside.

  6. Sprinkle the hot oil with some flour and if it bubbles really quickly right away, your oil is ready for frying. Place as many nuggets as possible in the oil, and fry until the bottoms are golden, turn and fry until the other side is golden. Will take about 4-5 minutes per side. Remove to a towel-lined plate (to catch any excess oil).

  7. Serve with honey or honey mustard (1 Tablespoon of honey 1 teaspoon of mustard) or spicy honey mustard (1 Tablespoon of honey 1 teaspoon of mustard a few dashes of your favorite hot sauce) or catchup or ranch dressing - get the idea? Just use your favorite condiment(s).


Floured and flattenedFrying awayMy giant mess!