Thursday, November 13, 2008

Pumpkin Cream Cheese Muffins


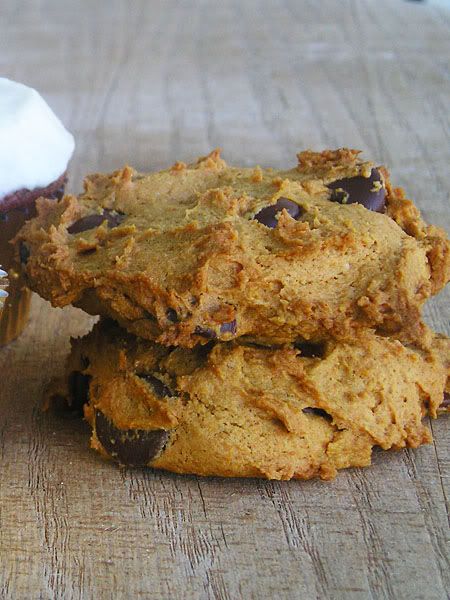
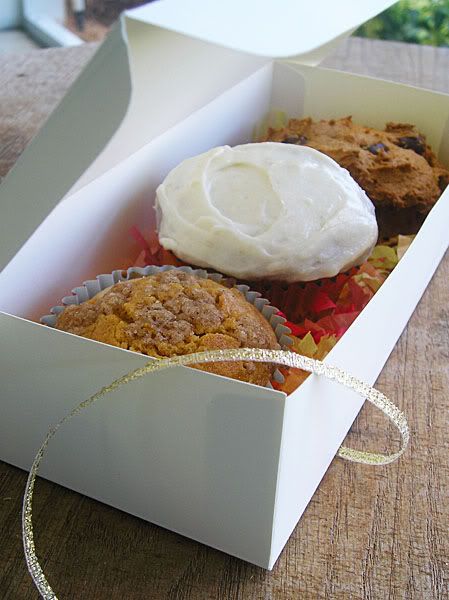
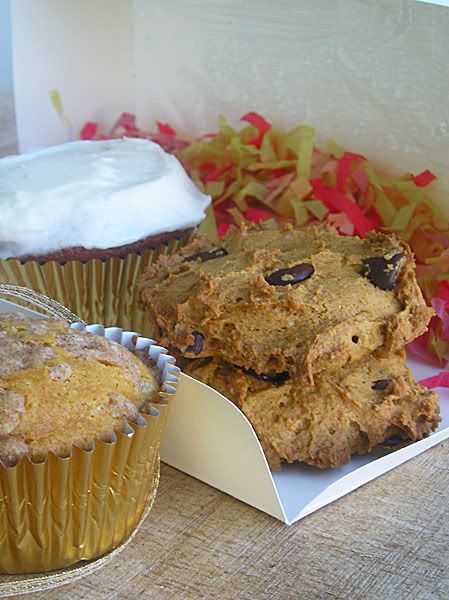
Here is the third and final recipe from my pumpkin-treats collection. This is the best of the three with it's complex combination of complementary flavors creating a combustion of creative climax! Woohoo, alliteration is useful for more than just high school english class! But yes, as I was saying, these muffins are delicious. And easy despite requiring numerous bowls.

Notes
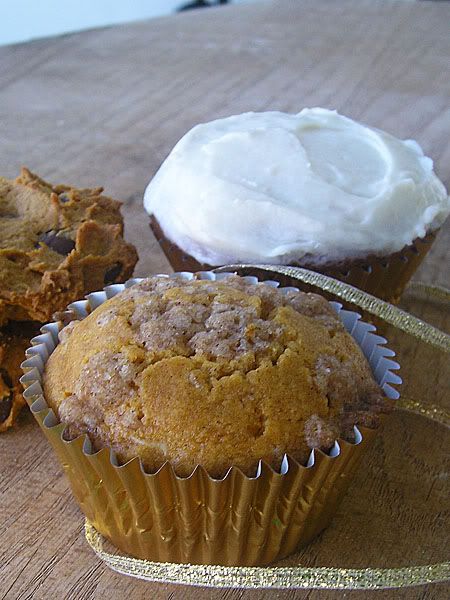
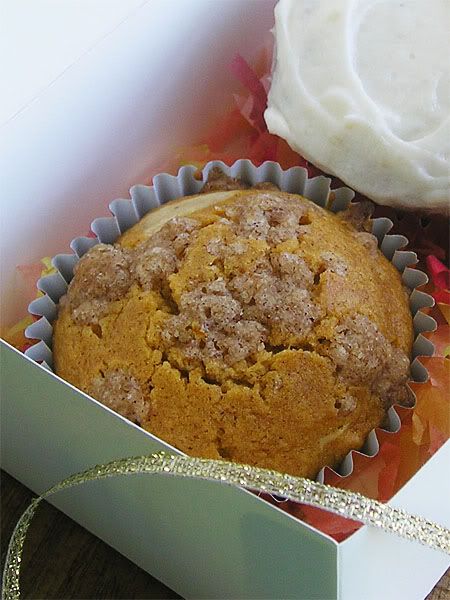
  1. When filling the cupcake pan I take about a tablespoon of batter and kind of spread it on the bottom and sides of the cupcake liner, leaving an empty space to dollop in the cream cheese mixture. Then I fill it the rest of the way with the muffin batter and top with streusel.
  2. Alternately, I will also fill the liner 2/3 with muffin batter and do the best I can to make a little well in the middle and fill it with cream cheese mixture. This way you can see the cream cheese before you even bite into the muffin.
  3. If you prefer a lighter muffin feel free to replace the brown sugar in the muffin batter with white sugar. Alternately, replace the white sugar with brown for a heavier muffin.
The Verdict

Delicious delicious delicious. These were by far the hit. Mr. C's boss made a point of telling him how good they were; Mr. C, my Mom and my sister both liked them best; I think they were the best of the bunch. And if one is allowed to use compliments from previous years, they were well-received at the pumpkin carving party I made them for last year. These are killer muffins! The cream cheese mixture isn't too strong in flavor and isn't mushy or anything and the streusel adds a nice sweet crispiness to the top of the muffin.

The recipe is from trusty old AllRecipes.com and submitted by Barb:

Ingredients
    Filling
  • 1 package cream cheese, 8 oz
  • 1 egg
  • 1 tsp vanilla extract
  • 3 Tbsp brown sugar
    Streusel
  • 3 1/2 Tbsp all-purpose flour
  • 5 Tbsp brown sugar
  • 3/4 tsp ground cinnamon
  • 4 Tbsp butter
    Batter
  • 2 1/2 cups all-purpose flour
  • 1 cup white sugar
  • 1 cup brown sugar
  • 2 tsp baking powder
  • 1 tsp ground cinnamon
  • 1 Tbsp pumpkin pie spice
  • 1/2 tsp salt
  • 2 eggs
  • 1 1/3 cups canned pumpkin (about 15 oz)
  • 1/3 cup vegetable oil
  • 2 tsp vanilla extract
Makes about 18 muffins.

Directions
  1. Preheat oven to 375 degrees F (190 degrees C). Grease and flour 18 muffin cups, or use paper liners.

  2. Filling: In a medium bowl, beat cream cheese until soft. Add egg, vanilla and brown sugar. Beat until smooth (although small lumps are fine), then put in fridge until ready to use.

  3. Streusel: In a medium bowl, mix flour, sugar and cinnamon. Add butter and cut it in with a fork until crumbly. Put in fridge until ready to use.

  4. Batter: In a large bowl, sift together flour, sugar, baking powder, cinnamon and salt. Make a well in the center of flour mixture and add eggs, pumpkin, olive oil and vanilla. Beat together until smooth.

  5. Place pumpkin mixture in muffin cups about 1/2 full. Then add one tablespoon of the cream cheese mixture right in the middle of the batter. Try to keep cream cheese from touching the paper cup (see notes for additional tips). Sprinkle on the streusel topping.

  6. Bake at 375 degrees F (195 degrees C) for 20 to 25 minutes.


Ok, video time. This one is great for those of you who are familiar with the little game called Minesweeper. It's hilarious in my opinion...hehe.


Wednesday, November 12, 2008

Pumpkin Cupcakes


Recipe number two! The pumpkin cupcake was very straight forward and easy to do. I topped it with my favorite hint-of-cream-cheese icing recipe which was a perfect match. It's nothing fancy, but very yummy.

Notes
  1. I've halved the original recipe here. The original makes enough for a double layer cake, but I didn't need that many cupcakes. So just double this for a cake!
The Verdict

Delicious! The frosting has just a little bit of cream cheese so the flavor isn't overwhelming. The cupcakes were moist and delicious. I loved them and Mr. C's co-workers ate all the leftover ones so I think they were a hit. I would make these again (they're right up there as a competitor to my favorite red velvet cake recipe).

I found the cupcake recipe at About.com and the frosting recipe is from (Visions of) Sugar Plum:

Ingredients
    Cupcakes
  • 1 cup sugar
  • 1/2 cup vegetable oil
  • 2 large eggs
  • 1 cup all-purpose flour
  • 1 tsp baking soda
  • 1 tsp ground cinnamon
  • 1/4 tsp ground ginger
  • 1/2 tsp baking powder
  • 1/4 tsp salt
  • 1 cup pumpkin puree or cooked mashed pumpkin
  • 1/2 cup chopped pecans (I omitted these)
Frosting
  • 1/2 cup milk
  • 1/2 cup granulated sugar
  • 2 1/2 tbsp all purpose flour
  • pinch salt
  • 6 tbsp unsalted butter, softened
  • 2 ounces cream cheese, softened
  • 1 tsp vanilla extract
Makes about 12 cupcakes.

Directions
  1. Turn oven to 350 F.

  2. Combine sugar, vegetable oil and eggs in a large mixing bowl; mix well. Sift dry ingredients into a separate bowl.

  3. Stir into oil mixture, beating well. Stir in pumpkin puree.

  4. Pour batter into a lined cupcake pan and bake at 350° for 20 minutes or so? I can't remember precisely how long it took, I just checked in on them every so often until they were done.

  5. Turn out onto racks to cool.

  6. To make the frosting whisk together milk, sugar, flour and salt in a medium sized saucepan; bring to a boil, over medium heat, whisking frequently. Continue to boil for 1-2 minutes, or until thickened. Cool in the refrigerator or freezer until completely chilled.

  7. In a large mixing bowl, using a mixer on medium speed (or just a mixing spoon like I did), beat together butter and cream cheese until creamy, about 1-2 minutes. Beat in vanilla extract and chilled milk mixture, until well combined and fluffy, about 2-3 minutes.

  8. Spread frosting over cupcakes and enjoy!

Since I added a video in my last recipe I've decided to share a few more. This is unfortunately an April Fool's movie preview (so there won't really be a full length movie, booo) but it was still really cool to see Zelda made into a movie trailer!


Tuesday, November 11, 2008

Pumpkin Chocolate Chip Cookies


So here is the first pumpkin recipe I will share with you: Pumpkin Chocolate Chip Cookies. This was a time consuming recipe because I tried to drain the pumpkin puree of as much water as I could. See, in researching pumpkin cookie recipes I found that many complaints were that the cookie wasn't firm like a regular old chocolate chip cookie. One suggestion I came across was to squeeze the water out of the pumpkin puree so the batter/dough wasn't so moist. So I went ahead and did just that!

Notes
  1. As I mentioned, I drained as much water as I could from the pumpkin puree. I laid a paper towel on a plate, smeared all 15 ounces of pumpkin on that and then pressed another paper towel on the puree to soak up water. Once I had soaked as much as I could I would flip the "pumpkin pancake" onto another paper towel and start again. Every once in a while (especially after a lot of water had been removed) I would mix the pumpkin up to redistribute the moisture and soak some more out. I did end up with bone dry pumpkin but it was definitely much more solid and less moist when I was through.
  2. These cookies don't spread, rise, or change shape at all while cooking. Shape them how you want them before you pop them in the oven because every ridge and spike will still be there when they come out!
  3. Instead of using the suggested amounts of cinnamon, nutmeg, clove and ginger I used an equal mixture of pumpkin pie spice, cinnamon, nutmeg, and ginger.
The Verdict

Mr. C thought they were pretty yummy. I thought they were good as well - surprisingly I liked them best once they had cooled. Mr. C brought the leftovers to work with him and I believe there was only one left when he brought the tray back home. And finally, the people who received them in my pumpkin-treat-gift-box liked them, but I believe they enjoyed the muffins and cupcakes more. They did still end up muffin-y, but I think the drying-out process did help make them a little heavier than they otherwise would have been.

I found the recipe at YumSugar:

Ingredients

  • 2 1/2 cups flour
  • 1 tsp salt
  • 1 tsp baking soda
  • 1 tsp cinnamon
  • 1/2 tsp nutmeg
  • 1/2 tsp clove
  • pinch of ground ginger
  • 1/2 cup (1 stick) butter, room temperature
  • 1 cup brown sugar
  • 1/2 cup sugar
  • 1 egg, room temperature
  • 15 oz can of pure pumpkin
  • 1 tsp vanilla extract
  • 1-2 cups chocolate chips (I used dark chocolate - yum!)
Makes about 26 or so cookies.

Directions
  1. Preheat oven to 375 F.

  2. Sift together (or whisk in small bowl) flour, salt, baking soda, cinnamon, nutmeg, clove and ginger together and set aside.

  3. Beat butter, brown sugar and sugar together in a large mixer bowl. Add the pumpkin and vanilla and mix until incorporated. Then add the egg and beat well until fully incorporated.

  4. Gradually (I do it in 3 batches) beat the flour mixture into the wet mixture. Stir in chocolate chips.

  5. Drop rounded spoonfuls onto baking sheets lined with parchment paper and bake for 13-15 minutes until edges start to brown. Remove from oven and let sit on hot baking sheet for 2 more minutes.

  6. Move cookies to wire rack to cool completely.


And I have an extra something I need to tack onto the end here... My friends Dela and Adam know how much I like the movie The Matrix so they sent me a spoof video called The Matrix Runs on Windows. It cracked me up so I have to share it:


Monday, November 10, 2008

Pumpkin Treats


I have a confession to make - I have a thing for pumpkin. When October rolls around I get a hankering to make all sort so of pumpkin-y treats for myself. Things such as pumpkin pancakes, pumpkin bourbon cheesecake, pumpkin muffins, pumpkin cupcakes, pumpkin cookies, etc. So this year I decided to spread the pumpkin love and make some of these goodies for family and friends! I went with my favorite pumpkin cream cheese muffins with a side of pumpkin cupcakes and pumpkin chocolate chip cookies.

Not only did I bake the goods, but I also made the boxes! I can be so clever when I put mind to it! Eh, ok, so it's not *that* clever, but I was proud. I even cut up bits of fall-colored tissue paper as a fun colorful filler for inside the boxes. And unfortunately my boxes were just a tad too short for the cupcakes (even after I had cut their tippy-tops off) and by the time I gave them away the oils in the icing had made a little damp spot on the top of the box. Even the tissue paper band and ribbon didn't quite cover it up. Ooops!

Let me tell you, I spent all day making these things. Morning to evening! My feet were killing me by the end of the day. I ended up with quite a bit more than I was gift-boxing so Mr. C took the numerous leftovers (after I'd had a day to devour a few) to work where it seems they were a big hit. Always nice to know you're appreciated!

I will be posting these recipes in the future as well. Let me tell you though, my secret favorite was the pumpkin muffin... They're so delicious! The cupcakes were my second favorite with the cookie taking third place. Pumpkin cookies are a little bit hard to pull off I found. You can't really get a traditional chocolate chip cookie consistency - they tend to come out sort of muffin-y instead. They were still good though. Hope everyone enjoyed their pumpkin treats!


Wednesday, November 5, 2008

Ocean Pearls

Hello again! Haven't posted any real creations in a few months because I'm a slacker, but here we go. I actually made these about a month ago - just never took any pictures before now. And the pictures make them look vibrantly blue! Which is quite nice, but not quite true. Yes, they are a nice bright blue, but not as blue as the photos turned out. I won't complain though, I like the effect!

I made them with some cheapo hoop earrings and silver colored wire. I just... started wrapping really. Add a bead, wrap the wire, add a bead, wrap the wire, etcetera, until it ended up as a little web of beads. I actually undid the first pair I made and started over because I wrapped the beads so close together. When I put them on they were just too heavy for my delicate little ears to handle. So the second time around I added half the beads to each earring, and although they're still a bit heavy it's much more bearable!